
Homelab Series Index
Digital freedom: creating a personal services ecosystem without depending on big tech.
From Test Container to Production Deployment Link to heading
In the previous article we configured Proxmox, created a test LXC container, and installed Docker. Now it’s time to get serious: create a dedicated container for Immich and configure the final external storage.
External Storage Configuration Link to heading
In the previous article we mentioned the strategy of separating system and data. Now we’re implementing this separation concretely by configuring the external disk hermes.
External Disk Setup Link to heading
Connect the 256GB external SSD to the mini PC and proceed with complete configuration:
# FROM PROXMOX HOST - check available disks
lsblk

# Expected output - the new disk should appear as /dev/sda
# sda                            8:0    0 238.5G  0 disk
# nvme0n1                      259:0    0 238.5G  0 disk (system disk)
Formatting and Preparation Link to heading
# FROM PROXMOX HOST

# If disk already has data, clean it
wipefs -a /dev/sda

# Create Linux partition
echo "n
p
1


w" | fdisk /dev/sda

# Format with ext4
mkfs.ext4 -F /dev/sda1

# Label for recognition
e2label /dev/sda1 hermes
Hermes Shared Storage Configuration Link to heading
Configure the hermes disk as Directory Storage in Proxmox to share it between homelab containers.
# FROM PROXMOX HOST - not from container!

# Create mount directory
mkdir -p /mnt/hermes

# Mount the disk
mount /dev/sda1 /mnt/hermes

# Verify it's mounted correctly
df -h /mnt/hermes

# Should show something like:
# /dev/sda1    222G  xxx  xxx  x% /mnt/hermes
# NOT: /dev/mapper/pve-root
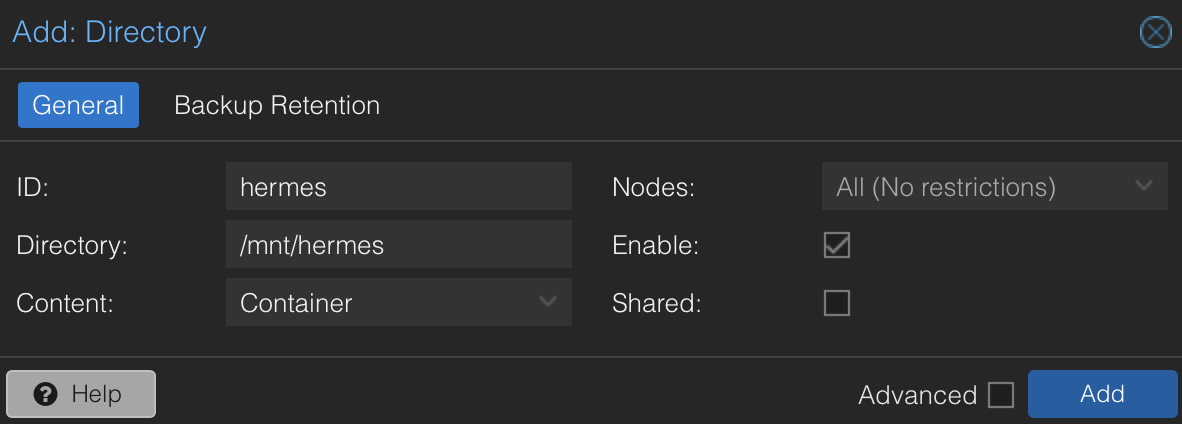
Add Hermes Storage to Proxmox Link to heading
Add the disk as Directory Storage in Proxmox:
Via Web Interface Link to heading
- Datacenter → Storage → Add → Directory
- ID:
hermes - Directory:
/mnt/hermes - Content: Select Container (VZDump backup files will be available automatically)
- Enable: ✓ Enabled
Make Mount Permanent Link to heading
# FROM PROXMOX HOST

# Get disk UUID
UUID=$(blkid /dev/sda1 -s UUID -o value)
echo "Found UUID: $UUID"

# Add to fstab for automatic mount on reboot
echo "UUID=$UUID /mnt/hermes ext4 defaults 0 2" >> /etc/fstab

# Test mount from fstab
umount /mnt/hermes && mount -a

# Verify it works
df -h /mnt/hermes
Prepare Directory Structure Link to heading
# FROM PROXMOX HOST

# Create directories for services
mkdir -p /mnt/hermes/{immich,navidrome,shared}

# Create subdirectories for Immich
mkdir -p /mnt/hermes/immich/{upload,database,redis-data}

# Verify structure
ls -la /mnt/hermes/

# Output should show:
# drwxr-xr-x immich/
# drwxr-xr-x navidrome/
# drwxr-xr-x shared/
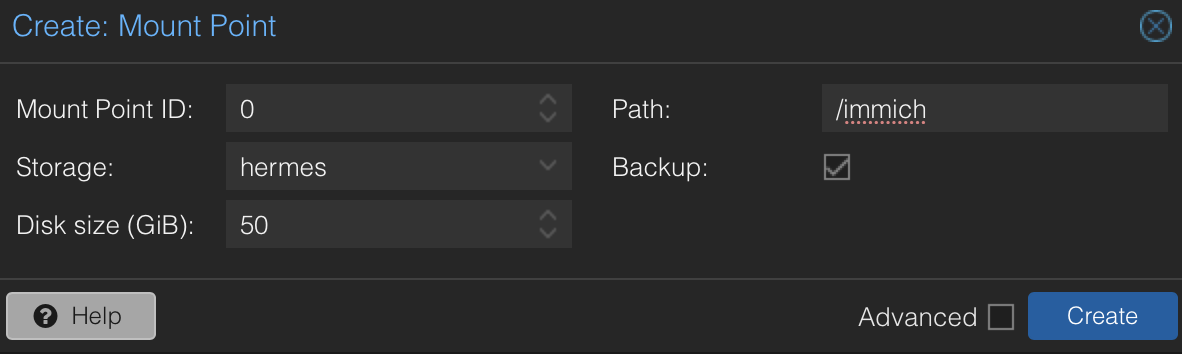
Immich Mount Point on Hermes Link to heading
Add the specific mount point for Immich to the container, pointing to the immich subdirectory of shared storage:
Via Proxmox Web Interface Link to heading
- Select the docker-immich container
- Resources → Add → Mount Point
- Mount Point ID:
mp0(assigned automatically) - Storage:
hermes - Disk size:
32 GB(initial size, expandable) - Path in Container:
/immich(where it will be mounted in the container) - Backup: ✓ (recommended for data)
- Enable: NOT Enabled
Docker Setup in Immich Container Link to heading
Docker installation in the new dedicated container:
# Enter dedicated container
pct enter 102

# Docker setup (same process as test container)
apt update && apt install -y curl
curl -fsSL https://get.docker.com | sudo sh
usermod -aG docker $USER

# Verify installation
docker --version

# Restart to apply docker group
exit
pct reboot 102
pct enter 102
Verify Mount Point Link to heading
# Verify mount point is available
df -h
ls -la /immich/

# Test write
touch /immich/test-write
ls -la /immich/test-write
rm /immich/test-write

# Create necessary directories for Immich
mkdir -p /immich/{upload,database,redis-data}
Immich Setup with Official Guide Link to heading
We follow the official Immich guide for Docker Compose, adapting it to our external storage.
Step 1 - Download Required Files Link to heading
# Create working directory
mkdir -p /root/immich-app
cd /root/immich-app

# Download official docker-compose.yml
wget -O docker-compose.yml https://github.com/immich-app/immich/releases/latest/download/docker-compose.yml

# Download example .env file
wget -O .env https://github.com/immich-app/immich/releases/latest/download/example.env

# Verify files were downloaded
ls -la
Step 2 - .env File Configuration Link to heading
Modify the .env file for our external storage setup:
# Edit .env file
nano .env
Custom .env configuration:
# External storage for photos and backup
UPLOAD_LOCATION=/immich/upload

# Database on external storage
DB_DATA_LOCATION=/immich/database

# Timezone (uncomment and customize)
TZ=Europe/Rome

# Immich version (pinned to release)
IMMICH_VERSION=release

# Database password (change to a secure one!)
DB_PASSWORD=immich_secure_password_123

# Default values (do not modify)
DB_USERNAME=postgres
DB_DATABASE_NAME=immich
DB_PASSWORD to a secure password using only A-Za-z0-9 characters. Use pwgen or online generators to create random passwords.Step 3 - Docker Compose Verification Link to heading
The downloaded docker-compose.yml file is official and up-to-date. For our setup, we should verify it points to the correct paths:
# Verify docker-compose.yml uses .env variables
cat docker-compose.yml | grep -A5 -B5 "UPLOAD_LOCATION\|DB_DATA_LOCATION"
.env to configure volumes. It’s not necessary to manually modify the YAML.Advanced Configurations Link to heading
For additional customizations, consult the Immich environment variables documentation.
Common Configurations Link to heading
# In .env file, add optional configurations:

# Video transcoding (for external SSD)
# FFMPEG_TRANSCODE=all

# Machine Learning (facial recognition)
# MACHINE_LEARNING_ENABLED=true

# Log level for debugging
# LOG_LEVEL=verbose
Step 4 - Storage Directory Preparation Link to heading
# In container, verify external storage is available
df -h /immich/

# Should show ~47GB available (the hermes disk)
# If showing few GB, check mount point from Proxmox host

# Create directories for Immich
mkdir -p /immich/{upload,database}

# Verify space and permissions
ls -la /immich/
id  # Verify docker group
Step 5 - First Launch Link to heading
Following the official guide, start Immich:
# From project directory
cd /root/immich-app

# Start with Docker Compose (official command)
docker compose up -d

# Check container status
docker compose ps

# Check logs for any errors
docker compose logs immich-server
Step 6 - Health Check and Troubleshooting Link to heading
# Verify all containers are healthy
docker compose ps

# If there are health check errors with Docker Engine < v25
# Comment out start_interval line in docker-compose.yml
sed -i 's/start_interval/#start_interval/' docker-compose.yml
Access and Initial Configuration Link to heading
Once started, Immich will be accessible at http://CONTAINER_IP:2283.
Initial setup:
- Create admin account
- Configure photo libraries
- Install mobile app and test connection
- Test upload of some photos to verify functionality
Next Steps Link to heading
With Immich operational and first photos uploaded, the homelab starts coming to life. The first service is online and functional, but there’s still a long road ahead!
The next articles in the series will cover:
- Automatic container and data backups
- Container destroy and backup restore tests
- Migration from iCloud Photos to Immich
→ Continue with: Homelab: Setup Navidrome per Streaming Musicale Privato